

How To Create A Docker Image For An Application
In a previous article, I explained how to create a virtual development workspace using
Docker. Thus, I thought that it would be great if I presented a slightly different example usingDocker. In this article, I am going to show you how to create a productionDockercontainer ready for deployment. To make it interesting, I will work on aJakartaEE, andMySQLapplication. Therefore, you will learn how to build a multiple building stagesDockerimage using one singleDockerfile. Brief, this article aims to teach you and encourage you to learn more aboutDocker, because it's a very interesting technology. Maybe in the upcoming articles, I am going to do the exact same usingDocker composerorDocker swarm(tell me if you are interested in such articles).
What are we trying to achieve?
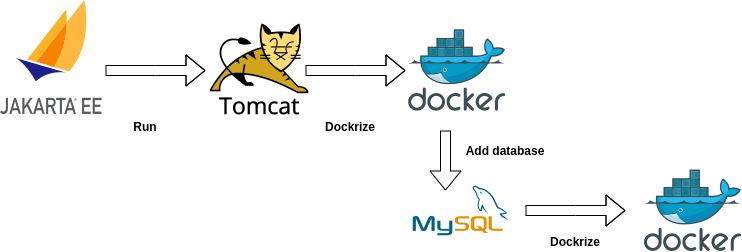
First things first, we need a ready-to-use JakartaEE application. Luckily, I already prepared an application that you can find in this Github repository. It is a JakartaEE application tested on tomcat and requires a MySQL database. Hence, we need only to create one simple Dockerfile to get the job done. This last should:
- Build the project. As a result, we will get a ready to run
.warfile. - Set up the
.warproduced file for ourTomcatapplication server. - Copy tomcat directory to new
Dockerimage in which we have ourMySQLdatabase ready to use. - Run the application!
That been said, the work on our single Dockerfile will be divided into two parties. In the first part we are going to work on the first and second step described above (let's call it Tomcat Side), and in the second part we are going to work on the third step (let's call it MySQL side). Finally, we will test our application.
Tomcat Side: Building and deploying the application to Tomcat application server
The application used in this article relies on the maven build tool. The simple following command generates the .war file:
$ mvn package
Firstly, to use Tomcat you can use the suitable Docker image from Tomcat (based on the used Linux distribution and JDK version) official page on DockerHub. In this case, I usedtomcat:8.5.63-jdk11 and I named TomcatSide. Surely, we will copy the project files into the Docker image and install maven to build the project. After building the project, deploying the application to Tomcat can be done easily by copying the generated .war file to tomcat/webapps directory. You can do this eventually using the command:
cp -rf ./target/Cabinet_Medical-0.0.1-SNAPSHOT.war /usr/local/tomcat/webapps
Consequently, the Tomcat side would be:
# Create Docker image based on the tomcat:8.5.63-jdk11 base image and name it TomcatSide. FROM tomcat:8.5.63-jdk11 AS tomcatside # Set up work directory WORKDIR /Cabiner_Medical # Copy the entire project to your Docker image COPY . . # Install maven RUN apt-get update && \ apt install maven -y && \ java -version && \ mvn -version # Build the project RUN mvn package # Deploy the .war file to Tomcat server RUN cp -rf ./target/Cabinet_Medical-0.0.1-SNAPSHOT.war /usr/local/tomcat/webapps
MySQL Side: Set up the database and run the application
As you may notice the previous section of this article isn't enough. We need our database! As the first section can be a general example of how to use tomcat in Docker, this one is a general example too that you can get inspired from to prepare your MySQL database and run a Tomcat server in Docker.
Hence, to create a Docker image with our I used a ready MySQL server Docker image from the official MySQL DockerHub container. Next, I set up the root user password, the database name, and the database schema. After that, I copied the /usr/local/tomcat directory from tomcatside image to the actual image. The following step is needed only so that we can run Tomcat server. It consists of installing the appropriate Java version and getting Tomcat application server ready for the final step, which is building our production image.
FROM mysql:latest # Set up the password and the database name ENV MYSQL_ROOT_PASSWORD=Strong@Independent1Password ENV MYSQL_DATABASE=bd_cabinetmedicale # Set up the database schema. The following line will result in having a database with tables and content # To avoid any problems you need to make sure that your SQL code works fine. ADD ./resources/dataBases.sql /docker-entrypoint-initdb.d WORKDIR /usr/local/tomcat # Copy the tomcat directory from tomcateside to this image COPY --from=tomcatside /usr/local/tomcat /usr/local/tomcat # Set up tomcat, and JDK WORKDIR /usr/local/tomcat/webapps ENV CATALINA_BASE=/usr/local/tomcat ENV CATALINA_HOME=/usr/local/tomcat ENV CATALINA_TMPDIR=usr/local/tomcat/temp ENV JRE_HOME=/usr ENV CLASSPATH=/usr/local/tomcat/bin/bootstrap.jar:/usr/local/tomcat/bin/tomcat-juli.jar RUN apt-get update && \ apt-get install openjdk-11-jdk -y && \ apt-get update && \ apt-get install ca-certificates-java && \ apt-get clean && \ update-ca-certificates -f && \ java -version ENV JAVA_HOME /usr/lib/jvm/java-11-openjdk RUN export JAVA_HOME && \ export CATALINA_BASE && \ export CATALINA_HOME && \ export CATALINA_TMPDIR && \ export JRE_HOME && \ export CLASSPATH # WORKDIR /var/run # RUN cp mysqld/ mysqld.bc -rf # RUN chown mysql:mysql mysqld.bc/ EXPOSE 8080 # Run the application WORKDIR /usr/local/tomcat/bin RUN chmod +x catalina.sh CMD ["/usr/local/tomcat/bin/catalina.sh", "run"]
And here it is the final Dockerfile:

One other final step
Congratulations, you created your Dockerfile you need only the following command to build the Docker image:
$ docker build --pull --rm -f "Dockerfile" -t cabinetmedical:latest "."
Also, you need this command to run your container:
$ docker run --name = "temp" -it -p 3306:3306/tcp -p 33060:33060/tcp -p 8080:8080/tcp cabinetmedical:latest
And to accede to the container's shell terminal:
$ docker exec -it temp
Finally:

Now that you completed your Dockerfile, you can build your image. Probably you will see something like this on your terminal:

Conclusion
This article is a simple example in which I used docker multiple stages building to create using a single Dockerfile a production Docker image. I was excited about this article because often after learning Docker we use it less in our projects. Instead, we just go to Dockerhub whenever we need a database image or any kind of image that we need to pull. Don't get me wrong please, I have nothing against that it is totally normal for me. However, you can make more exciting things using docker. That is why I highly encourage you to try to make something similar to what I did in this article in your project. I hope you enjoyed my article, and thank you!
How To Create A Docker Image For An Application
Source: https://dev.to/abdorah/how-to-create-production-docker-image-ready-for-deployment-4bbe
Posted by: muellerthateadthe.blogspot.com
0 Response to "How To Create A Docker Image For An Application"
Post a Comment